30 maggio 2010

Torta cioccolato e crema / Chocolate & Cream Cake

Cos'è un compleanno senza una torta?

Mamma fa gli anni oggi, ma siccome ha appena subito un intervento chirurgico ed ha il glucosio un po' sballato, la torta se l'è beccata di carta...

C'è voluto un po' di lavoro, anche solo per punzonare e dare forma a tutti i fiorellini che imitano i ciuffetti di crema!

La base è stata tagliata con la Cricut, con la quale ho "rifatto" la 3D Pop Up Cake della Sizzix, le decorazioni sono tutte fatte con carta gialla sulla quale ho usato vari punches di bordo della mia collezione, tre di Martha Stewart e uno di Stampin up. I fiorellini sono fatti con un vecchissimo punch a margherita.

Anche il sottotorta disegnato da me è tagliato con la Cricut, mi ci sto divertendo tantissimo!


Cake anyone?

Today is my Mom's birthday, but she just had surgery, and her blood glucose level is too high, so the only cake she had this time is a paper/cardstock one.

Making this cake was a bit time consuming, with all those tiny flowers glued around the tiers, but I thought they could look like cream decorations!

The cake base is cut out with my Cricut, and it very similar to the 3D Pop Up Cake that Sizzix made (an XL Bigz die). All the rest is done punching. I used three border punches of my Martha Stewart collection and another Stampin up one. The little flowers are a very old Carl daisy punch I got years ago.

I cut with my Cricut also the "doily" base, a very simple design of mine. I'm having a lot of fun with this baby!

29 maggio 2010

Cupcake

Biglietto senza troppi fronzoli per il compleanno del mio carissimo cognato, al quale voglio bene come a un fratello...

In ogni caso ho ritenuto opportuno evitare nastrini e frivolezze troppo eccessive, quindi ho iniziato con lo scegliere un cartoncino di base marrone e con il ritagliare con la Cricut una forma un po' elaborata da una carta da scrap intonata.

Ho quindi applicato questo layer al biglietto di base con dei quadratini di biadesivo spesso, in modo che il foro si notasse di più .
Ho poi ritagliato dal cartoncino bianco la stessa forma, di dimensioni leggermente ridotte, e l'ho incollata direttamente sulla base del biglietto.

Sopra questa ho attaccato, sempre con il biadesivo da rilievo, la cupcake (cartuccia Home Décor della Cricut) fatta con tre diversi cartoncini. Va bene evitare le frivolezze, ma almeno una cupcake...

La scritta Happy Birthday viene dal set "L'il Buddies" di Waltzingmouse Stamps, stampata in inchiostro Versafine "Vintage Sepia" su un cartoncino ritagliato con il punch "Modern Label" di Stampin Up.

Se a qualcuna serve, posso mettere in condivisione i files SVG e SCAL della forma che ho disegnato (ispirata ad una delle nuove fustelle Alterations di Tim Holtz per la Big Shot).


I needed a card for a man's birthday, so I decided to avoid "girly" embellishments but - hey - everybody loves cupcakes!

I begun cutting with my Cricut an ornate label in a DP layer and attaching the negative on a brown cardbase using pop dots.

Then I cut again the same shape, slightly smaller, from white cardstock, and glued this one directly on the card base.

The cupcake (from Cricut cartridge "Home Décor") is cut two times in two different cardstocks to obtain different colors for the cup and the top. I glued the two pieces on a pale yellow shadow, then attached the whole cupcake onto the white label using pop dots.

The "happy birthday" stamp is from the L'il Buddies set by Waltzingmouse Stamps, stamped in Vintage Sepia Versafine Ink on the same pale yellow cardstock, punched with SU Modern Label punch.

Would someone be interested in it, I can share the SVG and SCAL files of the label (inspired by Tim Holtz new Alterations Big Shot dies).

26 maggio 2010

Incontri


Che ne dite, non è una spilla stupenda? Non mi invidiate un pochino? Dai, su, dite la verità ;-D

Una delle cose veramente positive di questo hobby è che - anni fa - mi ha fatto conoscere delle ragazze che ora posso veramente definire amiche, nel senso più nobile e profondo del termine.

Prima ci vedevamo per fare stamping e condividere tecniche ed idee. Poi piano piano lo stamping è diventato solo una scusa per vederci.

Perché ci piace stare insieme. Stiamo bene, ridiamo (tanto), chiacchieriamo (tanto), mangiamo (tantissimo, specie i dolci ma anche il resto).

I nostri incontri sono organizzati in genere in maniera fulminea ("Ci siete domani o dopodomani? Allora ci vediamo?") eppure ogni volta le mie amiche mi stupiscono portando regali stupendi fatti a mano.

La spilla all'uncinetto a forma di rosa è l'ultimo regalo che mi ha portato Monica (del blog My Bonnet Bee). Tra l'altro io adoro l'azzurro! E guardate la confezione! Non è una meraviglia pure lei?


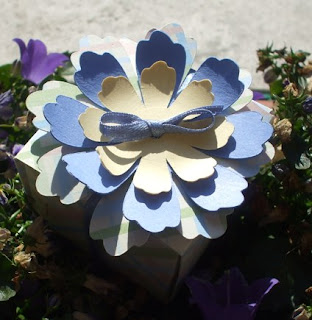
Io stavolta ho fatto solo delle scatoline di cioccolatini con la Cricut (non sono brava come Monica...).

Sono scatoline che non hanno bisogno di colla, perché sono tenute chiuse da incastri. Il fiore più grande, quello in carta decorata, fa parte della scatola, i due più piccoli servono da fermanastro.


Rubo una foto della scatola aperta dal blog di Monica perché le mie le ho fatte di corsa, e a scatole chiuse. Quasi quasi potrei proporla come scatola portaconfetti per un battesimo o un matrimonio...


Roba vecchia / Old stuff

Ogni tanto faccio lavori e mi dimentico di fotografarli. quindi non arrivano mai sul blog. Ma a volte mi restano avanzi che butto in quelle che con le mie amiche chiamo "le mie pattumierine".

Ad esempio la fascia centrale di questo biglietto è un avanzo di un altro lavoro che non è mai passato su questi schermi. Si tratta di un pezzo di carta scarabocchiato con una candelina IKEA, spugnato con i tamponi Distress Inks e sovrastampato con due timbri Scrapblocks di Cornish Heritage Farms ("Distressed Circles" e "Vintage Text").

Ho usato lo stesso "Vintage Text" con l'inchiostro marrone per dare un po' di movimento anche alla base.

Il timbro "Dare to be remarkable" è di Inque Boutique, dal set "Quotopia" che ho trovato su eBay.

La label su cui è stampata la frase assomiglia alle Nestabilities "Labels 9" ma è tagliata con la Cricut, e anche le linee azzurre sul bordo sono fatte dalla Cricut, usando le penne apposite, Cri-Kits.

I bordini neri sono fatti con un border punch di Stampin Up, che credo si chiami Pinking Hearts.


Sometimes I make stuff that I forget to take photo of, and that you'll never see on this blog. Anyway, these projects leave behind scraps that I didn't use and that I keep in boxes that my friend and I call "my little waste baskets" until I find how to use them.

That's what happened to the colored strip I used in the center of this card. It's a scrap of a background paper I made scribbling on white cardstock with a tea candle, sponging with Distress Inks then stamping two different Scrapblocks from Cornish Heritage Farms ("Distressed Circles" and "Vintage Text"). I used the Vintage Text also on the brown layer (Stampin Up Chocolate Chip cardstock).

The "Dare to be remarkable" text is from an Inque Boutique set named Quotopia (I found it on eBay), stamped on a label cut out with my Cricut. I also used my new Cri-Kits Cricut pens to make the machine draw the border.

The black strips are punched with a Stampin Up Punch, I think it's called the Pinking Hearts, but I'm not sure...

10 maggio 2010

Farfalla vivace / Bright Butterfly

Ma quando arriva la primavera? Io aspetto paziente (soprattutto perché non posso farci niente...) e intanto provo a consolarmi con farfalle e colori vivaci.

Timbri nuovi, timbri vecchi... è nuova la farfalla (Inkadinkado "Garden Delight"), meno nuovo lo sfondo a registro (Hero Arts "Ledger") e le foglie (Papertrey Ink "Turning a new leaf").

Mooolto vecchio invece il timbro che riporta la celebre frase di Pavese "non ricordiamo i giorni, ricordiamo i momenti" (PSX "Moments").

I colori usati sono per lo sfondo sono i Distress Inks "Wild Honey", "Crushed Olive" e "Frayed Burlap", spugnati a caso. Le foglie sono stampate con inchiostro a pigmento Versacolor "Bamboo", mentre lo sfondo a registro è stampato in Versafine Marrone.

La farfalla e la scritta sono invece stampate in Versafine nero perché volevo che spiccassero nettamente sullo sfondo.

Le ali sono colorate con i pennarelli acquarellabili Impress nei colori "Tangerine", "Pansy", Cerulean Blue" e "Celeste Blue". Ho ritagliato la farfalla e ho incurvato prima il corpo e poi ogni ala ad "S" in modo da darle più dimensione. In questa foto non si nota tanto, ma c'è veramente molto rilievo nella farfalla.

E' un po' che non faccio biglietti, ma oggi mi è venuta la voglia. So già a chi mandare questo, speriamo che piaccia alla destinataria...


I can't wait for Spring to arrive! Yes, I know that it's Spring already, but not here... we've got rain, and rain, and if we are lucky a cloudy day, then rain again. And cold. I hate cold. So I try to cheer myself up with some bright colors and butterflies.

New stamps and old stamps. New (to me) the butterfly (Inkadinkado "Garden Delight"), less new the background stamp (Hero Arts "Ledger") and the leaves (Papertrey Ink "Turning a New Leaf").

Absolutely old the stamp "Moments" from PSX.

I sponged the background using Distress Inks "Wild Honey", "Crushed Olive" and "Frayed Burlap". Then I stamped the leaves in Versacolor "Bamboo" pigment ink. The Ledger is stamped in Versafine "Vintage Sepia".

I used Onyx Black Versafine for the Butterfly and the saying stamp because I wanted them to really pop up from the background.

The wings of the butterfly are watercolored (Impress watercolor Markers "Tangerine", "Pansy", "Cerulean Blue" and "Celeste Blue"). I cut out the butterfly then used a scoring tool to shape the body and give an "S" shape to the wings.

You can't tell it from this photo, but the butterfly really seems about to take flight...