31 luglio 2007

Tamponata / Bumped!


Flossie mi ha tamponata... ovvero mi ha passato il "ce l'hai" su questa simpatica catena, un po' diversa dal solito (e a suo modo più impegnativa).

Essere tamponato comporta l'obbligo di spedire un biglietto ad una persona a scelta, e quello di nominare altre cinque persone che facciano lo stesso, spedendo un biglietto o un qualsiasi lavoro personale.

Regole (riviste da me... ;-) )
1) spedisci un biglietto a qualcuno che conosci entro 7 giorni! (famiglia, amici, corrispondenti anche solo "informatici") Chiunque, non importa chi! Immagina il suo sorriso quando aprirà la casella e vedrà il biglietto (invece della solita bolletta dell'elettricità, aggiungo io)
2) tagga (è l'unico modo di far circolare questa cosa) 5 persone che conosci, chiedendogli di spedire qualcosa a qualcuno
3) mostra con orgoglio questo tag sul tuo blog, e continua a spargere gioia!

Una volta tanto taggo anch'io... le taggate sono in fondo. Cicca cicca!


I've been "bumped" by Flossie... so now I have to send a card to someone within 7 days. This is really a fun tag!

The rules are simple:

1) Send ONE card to someone you know within 7 days! (family, friends, associates, cyber people, etc.) ANYONE!!! Doesn't matter who... just do it. Can you imagine the smile on their face when they open their mailbox and see a card from you?2
2) Tag (yes, I know, but this is the only way to spread this) 5 people you know to do the same thing (Tag means tag them to send their own cards to their own people
3) Proudly display this on your blog to spread a little sunshine and pass it on.

As you can see the rules state that I'd have to tag other 5 people who will have to tag other 5.... etc.

Well, I now officially tag...

RosyScrap
Inkerdoodles
Luciana
Michelle O'Haire
FioreLabs

30 luglio 2007

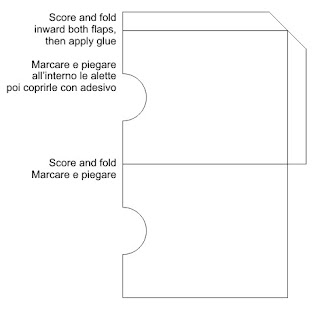
Template per custodia ATC / ATC holder template

Ho ricevuto alcuni messaggi in cui mi si chiedeva il template della custodia per ATC. Devo dare il giusto credito: ho trovato l'idea nel blog di Paula Ponders mentre cercavo su internet informazioni sulle ATC, che non avevo mai fatto. Non sapevo niente di niente, a parte che sono piccole (ho visto alcuni capolavori di Joan, tempo fa) e cercavo riferimenti precisi sulla misura e sulle eventuali "regole". In passato avevo già fatto piccole custodie del genere, solo che non ci pensavo più... (Herr Alzheimer in visita!).

Paula nel blog mostra diverse fotografie, con le misure accuratamente segnate, ma visto che sono pigra e non mi vengono mai due cose uguali se mi affido solo al righello, ho pensato di farmi il solito template con Corel.

Lo posto qui. Una volta scaricato dovrebbe essere a misura naturale, quindi potete stampare su cartoncino e ritagliare una copertina e il numero necessario di bustine. Consiglio di usare cartoncino per la copertina, e qualcosa di più sottile per le bustine interne. Con queste misure può ospitare 8/9 buste con le relative ATC (se sono sottili), altrimenti un po' meno.

Altro consiglio è di utilizzare, se l'avete, una fustella rotonda da 1" - 1-1/4" per ritagliare il cerchio che consente di afferrare l'ATC inserita. Altrimenti potete usare una fustella quadrata - come fa Paula - o dare due tagli angolati con una forbice. Provate anche altre fustelle...

Fatte le bustine, vanno attaccate l'una all'altra con un punto di cucitrice, e l'ultima va fatta aderire al fondo della copertina con biadesivo o colla forte.

I received requests for the ATC holder template I used. I must give credit: I found the idea in Paula Ponders's blog while I was looking for info about the ATC (it was my first try and I didn't know the exact size and rules). She has a lot of very nice photos, with very accurate measurements, but I can't rely on myself when it comes to draw something using just a ruler, so I made one of my Corel templates. I made something similar time ago, but I completely forgot about it (Senior moment...).

Here it is. Once downloaded and printed it should be of the right size, so you can print one cover and the number of envelopes you need. The size of spine I used can hold up to 8/9 envelopes with their ATC (if these last are thin ones). I suggest to use cardstock for the cover and thinner sheets for the inner envelopes. Another tip is to use a circle punch to cut out the finger hole. Paula, in her tutorial, used a square one to obtain a "V" shaped finger hole, but you can naturally use any kind of punch (I'm thinking of the little scalloped circle, or SU round tab punch...) or your faithful scissors.

Once the envelopes are made, staple them together and adhere the last one to the back cover using double stick adhesive or strong glue.

29 luglio 2007

ATCs

Sono stata contattata da Linda - http://lindadegucht.blogspot.com/ - che vive in Belgio. Mi ha proposto di partecipare con una - o più - ATCs alla preparazione di un'esposizione dal tema "viaggio intorno al mondo".

Mi ha anche chiesto di spargere la voce: più ATC arrivano, più grande diventa l'esposizione che possono organizzare. Vorrebbero addirittura tappezzarci un intero muro dell'esposizione! Almeno una delle ATC dovrebbe - se possibile - avere come tema il paese o la regione d'origine.

Chiunque fosse interessato a partecipare, può contattarla a questo indirizzo in inglese. Altrimenti potete scrivere a me, ed io scriverò a lei.

Le ATC dovrebbero arrivare entro il 1° settembre.

Io ho pensato di farne cinque, tutte di stili diversi. E di fare un piccolo contenitore per spedirle. Ecco qui...


I received a message from Linda, who lives in Belgium.

She asked me if I was interested in an ATC expositions she's preparing with her friends for HobbyClub Retro. The theme is "Travel Around The World" and the aim is to cover an entire wall with ATC.

I never made an ATC, but I agreed to try and to look for other people who could want to partecipate. At least one of the ATC should have a Country/Region theme. The technique is completely free.

If you want to send an ATC to Linda, please get in touch with her using
this address.

The ATC shoud arrive there by Sept. 1st.

I prepared 5 ATC - different styles and techniques - and a simple card holder to send them.

Guai eccetera / Troubles etc.

Guai... ho avuto grossi problemi con il computer, che per più di una settimana non ne ha voluto sapere di funzionare ma ho trovato la soluzione...

HO UN COMPUTER PORTATILE! Un gioiellino tutto mio, che si connette a internet grazie ad un router wireless, lasciando l'altro computer ormai anche lui funzionante, al maritino. Adesso non dobbiamo più giocare alla morra per aggiudicarci l'uso del PC!

Me l'ha regalato mio marito (periodo di grandi spese! Mi sa che il rumore che sento è il conto corrente che piange disperato) per il nostro ventitreesimo anniversario. Non quello di matrimonio, siamo solo al 19°. Il 23 luglio è l'anniversario del nostro primo appuntamento, e per noi è una data simbolica, molto, molto importante.

Ho avuto anche un bel po' di lavoro extra, ma qualcosa sono riuscita a fare... Prima di tutto però parto con i ringraziamenti, anche se mostruosamente in ritardo, in ordine di arrivo!

Questo bellissimo biglietto mi è stato spedito da Luciana. Nella foto non si vede benissimo, ma oltre ad un accuratissimo lavoro di ritaglio sul fiore, la parte verde è tutta lavorata ad embossing a secco a motivi di fiori.

Questo a destra, arrivato lo stesso giorno, è di Francesca, che oltre a stampare il micetto (simpaticissimo) l'ha anche abbellito con una colla dimensionale, che lo rende lucido.

Oltre al biglietto mi ha anche mandato un bel timbro, che potete vedere sotto il biglietto.


Ho poi ricevuto da Rosy un biglietto in carta naturale, con un cuore alato e perle.

Il biglietto è naturalmente molto bello, ma guardate questo matchbook che mi ha spedito!
Sulle pagine interne, in cartoncino colorato, c'è posto per piccole fotografie. Una bellissima idea, che copierò presto!


Ora tocca al book che mi ha mandato Tammy. Guardate che meraviglia...


Chiuso sembra una busta spessa, chiusa da una fascetta in cartoncino decorata.

Poi, però, una volta aperto...


Nelle parti che si aprono, che formano delle buste, ci sono delle tags porta fotografie. Visto di persona è ancora più bello di quanto sembri in fotografia!
Grazie a tutte per i bellissimi pensieri!


I had a lot of computer problems lately, but I found the perfect solution: I HAVE A LAPTOP COMPUTER. AND IT'S MINE! With this and a wireless router I can be connected to internet even when DH is working on the other PC...

All the items you see above are RAKs I received in the last days. I'm a lucky girl indeed!
Here, in the English part, I'd like to thank Tammy for the wonderful photo wallet in the photo above. A precious masterpiece that I'll cherish, and use for some my most beloved photos: the few ones I have of my father, who died when I was just a little girl.

Thank you Tammy! You're so sweet!

16 luglio 2007

Template borsa / Beach bag template

Ecco qui. Ho ricevuto delle richieste del template della borsina segnaposto, quindi l'ho fatto. E visto che in precedenza avevo ricevuto indicazioni di mettere le spiegazioni anche in inglese... l'ho fatto.

Naturalmente se avete curiosità potete lasciare un commento qui...


I received a lot of requests for the template of the super simple beach bag that you can see in the lower right corner of the sketch.

This time I added a little "how to" in English...

Oh, and remember that you can find other sketches in the template category of this blog. I'll update them adding English translations soon, be patient... but if you absolutely need a translation NOW, just ask.

15 luglio 2007

Segnaposto borsa / Beach bag "nameplate"

Presto qui ci sarà una festa. O almeno lo spero... nelle prossime settimane dovrei incontrare alcune care amiche, e pensavo (Cip... sta zitta) di preparare dei segnaposti un po' originali. Visto che è estate ho pensato di usare come tema la borsa da spiaggia.

La mia immaginazione bacata mi aveva anche proposto di fare delle finte pinne e una finta salviettona da spiaggia da far spuntare dalla borsa, ma le ho schiaffato in mano una tavoletta di cioccolato e l'ho zittita per un po'. Speriamo che duri!

La borsotta è semplicissima da fare ed in mancanza dei Prima Flowers (che mi stanno purtroppo inesorabilmente finendo) si possono mettere anche dei fiori ritagliati con le fustelle, o dei piccoli bottoni.

Non credo serva il template di questa, ma se qualcuno per caso vuole delle spiegazioni, basta che lasci un commento.

I'm preparing a little stamping party... you know, it's when you eat a lot, chat a lot, laugh a lot, and - perhaps - you ink ONE stamp... That's what usually happens when I have these friends here "chez moi".

I wanted to make something original to use as a placeholder and as a container for a treat and since it's summer I thought of a beach bag. I'll tie an itty bitty name tag to the straps. My insane stamping mojo suggested to add little flippers and a tiny beach towel peeping out, but I gave her a huge chocolate bar and this shut her up.

This purse is absolutely simple to make, and I don't think a template is necessary, but if you think it would be helpful,
I'll draw one.


Ricetta / Bag recipe
  • Timbri/Stamps:
    Baroque motifs (
    Stampin Up)
  • Inchiostri / Inks
    Certainly Celery, Pretty in Pink classic dye inks
    (Stampin Up)
    Impress Garnet Watercolor marker (Tsukineko)
  • Attrezzi / Tools
    Forbici sagomate / Scalloped scissors
  • Varie / Miscellaneous
    Prima Flowers
    Fermacampioni rosa / Pink brad

10 luglio 2007

Di corsa.../ In a rush...

E' tutta la settimana che per una ragione o per l'altra non riesco a combinare niente. Un po' perché sul lavoro siamo decimati dalle ferie e dai trasferimenti, un po' perché qui a casa sono nel casino più assoluto, dato che finalmente il maritino si è deciso a ridipingere le pareti e la cameretta (dove tengo tutto il necessario per i miei insani passatempi) è un magazzino, con teli tesi da tutte le parti. E se le cose sono come sembrano, vivrò da baraccata per parecchio...

Però mi sono arrivate le due fustelle ovali di Stampin Up che avevo ordinato un bel po' di tempo fa e ho pensato di provare a farci un fiorellone.

Biglietto da cinque minuti, non di più, giusto per farvi sapere che sono ancora viva.

Ah... le Poste hanno messo finalmente giudizio... Francesca e Luciana... sono arrivati insieme, li posto domani! Grazie mille!


Sometimes, usually without notice, my life becomes hectic. Some of my coworkers are on holidays, but the work is always the same... And - on top of this - my apartment is a mess, because my DH decided (better late than never) that it's time to paint the walls! The room where all my toys are stored is now a mere wreck (the floor is covered in tools, cans, brushes and sanding paper) and the furnitures are wrapped in old bedsheets.

But today I received two Stampin Up punches, the large and small oval ones so I made a five minutes card, just to have something to post and a chance to say that I'm still alive!

05 luglio 2007

Variazione sul tema / The same, but different...

Oggi ho fatto un regalo a mio marito per il suo compleanno. A dire il vero, il suo compleanno era a inizio marzo, ma quando gli ho proposto il regalo lui ha detto che si sarebbe guardato intorno per scegliere la migliore. Si, perché gli ho offerto in regalo una stampante laser a colori...

Ora non dite che l'ho fatto con un secondo fine, che in fondo la stampante la volevo io e altre cattiverie del genere. Non è così!

Però vi invito a dare un'occhiata alla striscia colorata a sinistra sul biglietto: è stampata con la MIA nuova stampante laser a colori! ;-D

Ora posso stamparmi le carte digitali nella misura e nella sfumatura che preferisco, e non resterò mai più senza "quella bellissima carta che mi piaceva da morire e che non fanno più, mannaggia a loro!".

Infatti è una stampante combo, con anche lo scanner che mi consente perfino una fotocopia a colori al volo di qualsiasi "carta" mi possa servire. Inoltre, essendo una stampante a toner e non a inchiostro, posso bagnare la carta o usarci sopra colle e fissatori senza temere che si sbiadisca o che il colore coli!

Il lavoretto di oggi è una variazione sul tema del mio ultimo biglietto... mi era rimasto un cerchio stampato con l'happy birthday e volevo tanto provare la stampante... in più rispetto all'ultimo c'è il bordo a festoni fatto con la fustella per stondare gli angoli (Corner Adorner, Rounder di EK Success - tutorial qui nel blog di Beate) e la cornice a fiore fatta con la fustella Slit Punch di Stampin Up (trovate il Tutorial qui, nel bellissimo blog di Sarah Moore). I petali sono ricavati da ritagli di nastro da quattro centimetri, incollati sotto il pezzo centrale. La ricetta completa in fondo al post, come al solito.


Today I bought a gift for my husband's birthday. To tell you the truth, his birthday was at the beginning of March, but then we decided to take a look around and chose wisely. Yes, because I told him that I was going to buy a color laser printer for him.

Now, don't tell me that it was a by-end, that I wanted that printer for me to play and similar naughty things. But take a look at the striped patterned paper on the left side of the card: it was printed with MY new color laser printer! LOL

Now I can print my own digital papers, in the size and hue I prefer and I won't run out of "that wonderful patterned paper that they don't sell anymore". Yes, because it's a combo printer, that has its own scanner on top. I could even color copy directly any kind of paper!

Today's card is very similar to the last one I posted: I still had one more stamped "happy birthday" circle and I wanted to try the new printer. On this one I put a corner rounder scallop border (see
Beate's tutorial here) and a flower frame made using a Stampin Up Slit Punch (Sarah Moore's tutorial here). The "petals" are made glueing ribbon pieces under the main layer.


Ricetta / Card recipe:
  • Timbri/Stamps:
    2928C Happy Birthday (Penny Black);
    Cornice a festoni (Impronte d'Autore)
  • Inchiostri / Inks:
    Sky Blue Versacolor;
    Indigo Blue Impress.
  • Accessori / Other tools
    Slit Punch (Stampin Up)
    Large Corner Adorner - Rounder (EK Success - Paper Shapers)
    Ribbon
    COLOR LASER PRINTER (ROTFL.....)

03 luglio 2007

Cerco aiuto... / Help requested

Ho rimandato, rimandato, rimandato per varie ragioni (la pigrizia innanzitutto) l'aggiornamento della lista dei links sul mio blog. Ora però mi trovo in una situazione spinosa: ho conosciuto tante bloggers, visitato le loro pagine, ci siamo scambiate lavoretti... e ora ho completamente perso il controllo sui links!

Per favore, se vi piacerebbe avere il link al vostro blog su questa pagina, mandatemi qui nome e link, che così finalmente aggiorno...
Grazie!

One thing people (perhaps) don't know about me... is that I'm lazy. So lazy that I had to train my cats to wake me up at the right time in the morning (I could sleep forever and more). So I shamelessly procrastinated the updating of my list of links and I completely lost control of the missing ones...

Should you like to have a link on your blog on this page, please send me a message
here, with your name and blog address.

Thank you!

Aggiornamento e sondaggio / Update and a poll

Lisa mi ha taggato, e se riesco a ricavare cinque minuti rispondo domani. Nel frattempo vorrei proporre un sondaggio: mi sembra di capire che spiegazioni puramente testuali in faccende come gli shadow stamps sono un po' carenti. Dovrei provare a fare dei tutorial fotografici? Potrebbero aiutare? Fateme sapé...


I was tagged by Lisa... OK Lisa, I'll try to do my best tomorrow...
I posted some templates on my blogs, some in Italian, some in English. Should I translate all of them in both languages? Should I try to make step-by-step tutorials with photos? Keep in mind that here in Italy stamping is just arrived and the techniques we use are rather simple...

Sopravvissuta / Survivor

E' stata, come prevedevo, una settimana complicata. Ogni tanto capita...

Meno male che ho avuto almeno due ragioni di essere contenta, anche se non no avuto modo di condividerle con voi fino ad oggi!

Giovedi ho ricevuto una busta imbottita e pacioccona. La giro e... è di Gio! La apro e ci trovo un meraviglioso e sciccosissimo sacchettino con bigliettino e dentro... IL MIO GRIGRI PERSONALIZZATO! Lusso lussurioso!

Ora... chi mi conosce sa che io non possiedo borse e poi non sopporterei l'idea di rovinarlo quindi ho deciso che gli attaccherò un nastro e lo trasformerò in un segnalibro!


E' o non è una meraviglia? Ed è MIO!


Il giorno dopo altra busta! Non riuscivo a crederci! Questa volta arrivava da Albenga, da dove Sonia mi ha mandato un altro capolavoro: questo portafotografie che farà bella mostra di sé in casa mia!

Chiuso è bello, ma guardatelo aperto!


Fiori, nastri, pizzi e una carta meravigliosa per un lavoro perfetto in ogni particolare! Grazie a tutte!

Senza i vostri meravigliosi regali il bilancio della settimana sarebbe stato assolutamente negativo!


Stasera ho prodotto anch'io: una cosa molto semplice, dato che sono ancora stanca e non mi sentivo tanto in vena creativa. In ogni caso devo fare tre biglietti di compleanno entro sabato. Sapete qual'è la cosa assurda? Che devo farne anche uno per me, da parte di mia madre! Mah...

Come potete vedere è veramente semplice, ma alla persona alla quale è destinato piacciono le cose semplici, il verde e l'azzurro, quindi li ho usati come colori dominanti.

Ci ho schiaffato anche un po' di rosa per "riscaldare" il tutto, che altrimenti sarebbe stato un po' troppo freddo.

Non credo di riuscire a fare altro domani, già so che sarà una giornata da incubo, unica nota positiva la probabile cena con un amico...


I survived, and this is the best I can say about last week. But I received two wonderful gifts from some of my blog readers! The first one is from Gio, and it's a personalized decoration for a purse. She used ribbons, prima flowers, and an enameled charm. Since I don't own a purse, I'll attach some some ribbon to it, and I'll use it as a bookmark! Isn't it great?

The second present is a handmade photo frame from Sonia, with Prima Flowers and ribbons. It's absolutely perfect, and I simply love it! I have some recent photos of my nephew's wedding, and I'll use it to display my favorite ones! I'm a really lucky (ehm...) gal.

The last image is a very simple birthday card I made tonight. I have to make three different birthday cards by Saturday and - this is totally absurd - I have to make one FOR ME (I'm my mom's official card maker... LOL)

This one is for my niece, who's hitting her 30 on July 7th. We'll have a party together this Sunday, because I'll be 45 on July 5th... Time flies!